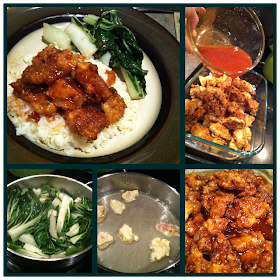
I found this recipe last summer and my family really loves it! I followed her recipe pretty close with a few slight variations for my personal tastes. As with anything requiring frying, this is a bit more involved and a little messier. Having said that, it is not really complicated or difficult for even a cooking novice with my step by step instructions.
I'm no Asian Cuisine expert by any means but my family really enjoys to eat Asian so I've tried expanding my cooking horizons. I'm not sure how "authentic" this recipe is but it sure is tasty! lol

Ingredients
- 4 chicken breast or 8 chicken breast portions, thawed
- 1.5 cups corn starch
- Salt and Pepper
- 4 eggs, beaten
FOR THE CHICKEN:
- 1/2 cup vegetable oil
- 1 cup sugar
- 5 Tbsp ketchup
- 1/4 cup white vinegar
- 4 tsp soy sauce
- 1/4 Apple cider vinegar
- 1 tsp garlic salt
FOR THE Sauce:
- Frying pan
- Cutting board
- Cutting knife
- 2 small bowls (for cornstarch and eggs)
- 1 medium bowl (for sauce)
- 9x13 baking dish
- Fork or spoon for turning chicken in oil
- Serving spoon
Utensils you Need:
Directions
- Preheat oven to 325
- Pour measured cornstarch and beaten eggs into separate small bowls
- Pour oil into frying pan and turn heat onto medium-high or 6-7
- Using cutting board, trim fat, and cut chicken into bite size pieces
- Dredge seasoned chicken pieces first into eggs then into cornstarch ensuring chicken is thoroughly covered.
- Check to see if oil is ready for frying. Easiest way to do this is to run your fingers under the water real quick and flick excess water into oil. If it bubbles and pops the. The oil is ready. If no reaction the. Wait a bit longer. If the oil is not hot enough then the coated chicken will simply soak up the oil and will not get crisp or brown.
- Shaking off excess cornstarch, place chicken into hot oil until brown. About 2-3 minutes depending on your stove and cookware. Using fork or spoon, turn until seared on both sides. We aren't worried about it being cooked all the way through because this is going into the oven to cook further.
- Once browned, remove from oil and place straight into 9x13 baking dish.
- Repeat dredging and browning process until all chicken has been fried and is now in the baking dish.
- Mix all sauce ingredients together in medium bowl. Be sure to drag your fork along the bottom of the bowl as the sugar will settle on the bottom.
- Once well mixed pour evenly over top of chicken.
- Using mixing spoon, stir chicken in sauce to ensure an even coating of sauce.
- Place baking dish in middle rack of oven and bake for 45-60 minutes stirring every 15 minutes to make sure the chicken all get covered well with sauce. You will know it is done cooking when the sauce has thickened enough to coat the chicken without excess sauce still on the bottom of the dish
- While chicken is baking rinse out the same pan you fried the chicken in.
- Cut end off of bok choy
- Rinse well to remove all dirt
- Chop into smaller 2-3 inch pieces
- Pour 2Tbsp vegetable oil into cold pan along with 2 Tbsp crushed garlic and 1Tbsp ground ginger
- Turn heat onto medium
- Sautée ginger and garlic for about 3 minutes until aromatic (smells good lol) without singeing at all.
- Add chopped bok choy and stir well to coat with garlic and ginger.
- Pan will be full at first but as with all greens, quickly cooks down.
- Keep turning greens (I prefer to use tongs but a spoon will work as well) to keep anything from singeing. If the garlic starts to do more than lightly brown then it will quickly become very bitter. No good.
- Greens are done when they are soft yet not mushy. You still want some nice texture to them.
- When done take off heat and cover to keep warm until chicken is done
- Start cooking your rice per package instructions. even though you want "plain" white rice to pair with the very seasoned chicken, I still put a good dollop (or 2) or butter in my rice for a bit extra flavor.


No comments:
Post a Comment